Sunday, December 26, 2010
Is Korean the new Chinese and French macarons the new cupcake?
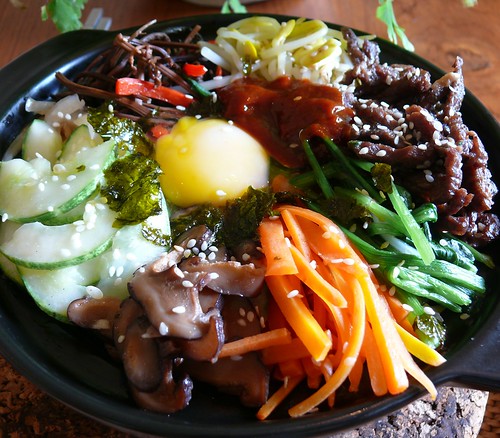
If so, then I have been loving those two for a long time now. Still haven't attempted to make my own macarons yet though. Yahoo Shine predicts food trends for 2011. Just look at how colorful both dishes are, especially the Korean bibimbap dish. They say if you want to be healthier, then eat the rainbow. I have eaten this dish before and it is very fulfilling. Ummm, I think I want to go try this Korean restaurant in town tomorrow. There aren't many (if any at all) good Korean restaurants in the Twin Cities, but I'll give this one a try anyway. It takes a long time for me to make this dish.
Monday, November 22, 2010
Duncan Hines Devil's Food Cake Mix: Don't fix what's not broken.
Ok, I have attempted to bake a chocolate cake from scratch 3x now. One of them turned out good. The other two not so. I bought a box of Duncan Hines Devil's Food Cake Mix just in case they didn't turn out. Since it was just sitting in the pantry, I decided to bake some cupcakes out of the box. Boy, were they good! I had them before, but haven't had them in a long time. They're rich, moist and very chocolaty. They're perfect! I don't care what anyone says about cake in a box because nothing beats this chocolate cake especially when you eat it a few moments later right from the oven. I hate store bought frosting though. It just has a very artificial flavor to it. I bought this new glaze from the store and didn't like it. So, I made up my mind. I'm not going to attempt to make a chocolate cake from scratch again because I like this one as it is. Why go through all that trouble and $$ just to make one when there's nothing wrong with this one?
Yum, yum. So moist and yummy:
Sunday, November 21, 2010
Semi-Homemade Pumpkin Pie
Pumpkin pie is one of my favorite desserts especially during this time of the year. Some people don't like it, but I always liked it. The best pumpkin pie I've had is the one from Baker's Square. This one I baked recently is pretty good too; it's almost as good as Baker's Square. I think. That is if I could remember my taste buds correctly. I actually put a half cup of (white) sugar more than what the original recipe called for and it's pretty sweet, but I remember the pie from Baker's tasting pretty sweet as well. I would go with 3/4 cup next time. It's the cream cheese that makes it taste different than regular pumpkin pie. I like this recipe, however, after I put it in the fridge overnight and ate it the next day again, it didn't taste home made anymore. It tasted pretty commercial to me. I wondered if using fresh pumpkin puree and making my own pie crust would've made a difference. Oh well, too much work! I always thought eating pumpkin pie was healthier than having other desserts because I never bothered to look at the ingredients, but now I know!
Original recipe from Food Network:
Ingredients
For Pie:
4 ounces cream cheese, at room temperature
1 (15-ounce) can pumpkin puree
1/3 cup heavy whipping cream
1/2 cup light brown sugar
1 teaspoon pumpkin pie spice
3 large eggs
1 (9-inch) frozen pie crust shell, removed from foil tin and placed in glass pie pan
For Brown Sugar Whipped Cream:
1 cup heavy whipping cream
3 tablespoons brown sugar
1/2 teaspoon pumpkin pie spice
Directions
Preheat the oven to 375 degrees F and arrange a rack in the bottom third of the oven.
In a medium bowl, combine the cream cheese, pumpkin puree, cream, brown sugar and pumpkin pie spice. Using electric hand mixer, add the eggs, 1 at a time incorporating completely between each addition.
Pour the filling into the pie shell and bake on a sheet tray until the filling is mostly set and the crust has browned, about 50 to 60 minutes. The center will still look slightly loose. Remove from the oven and cool to room temperature.
For Whipped Cream:
In a chilled bowl, beat the heavy cream with a hand mixer until beginning to thicken. Add the brown sugar and pumpkin pie spice and continue to beat until soft peaks form. Spread the whipped cream over the pie and serve immediately or hold in the refrigerator for up to 2 hours before serving. .
Ran out of whipped cream...
I was actually going to attempt this recipe from Food Network, but didn't feel like doing everything from scratch. It sounds so much better since it uses fresh pumpkin puree and a homemade pie crust. Can you tell I love the Food Network? I used to watch it while exercising and then wonder why I was so hungry after my workout was done. :p
Thursday, November 11, 2010
Homemade Chicken Noodle Soup
I always wanted to make my own chicken broth from scratch, so I bought some ingredients to make some home made chicken noodle soup. This was quite good. It tasted wholesome and pure. It didn't taste like it had artificial chicken flavors and salt in it. Everything was natural. Once you do add in some salt and pepper at the end, then that's all you need. I was hoping the soup would last me all week, but it was gone in one day.
Original Recipe:
Ingredients
2 tablespoons extra-virgin olive oil
1 medium onion, chopped
3 garlic cloves, minced
2 medium carrots, cut diagonally into 1/2-inch-thick slices
2 celery ribs, halved lengthwise, and cut into 1/2-inch-thick slices
4 fresh thyme sprigs
1 bay leaf
2 quarts chicken stock, recipe follows
8 ounces dried wide egg noodles
1 1/2 cups shredded cooked chicken
Kosher salt and freshly ground black pepper
1 handful fresh flat-leaf parsley, finely chopped
Directions
Place a soup pot over medium heat and coat with the oil. Add the onion, garlic, carrots, celery, thyme and bay leaf. Cook and stir for about 6 minutes, until the vegetables are softened but not browned. Pour in the chicken stock and bring the liquid to a boil. Add the noodles and simmer for 5 minutes until tender. Fold in the chicken, and continue to simmer for another couple of minutes to heat through; season with salt and pepper. Sprinkle with chopped parsley before serving.
Chicken Stock:
1 whole free-range chicken (about 3 1/2 pounds), rinsed, giblets discarded
2 carrots, cut in large chunks
3 celery stalks, cut in large chunks
2 large white onions, quartered
1 head of garlic, halved
1 turnip, halved
1/4 bunch fresh thyme
2 bay leaves
1 teaspoon whole black peppercorns
Place the chicken and vegetables in a large stockpot over medium heat. Pour in only enough cold water to cover (about 3 quarts); too much will make the broth taste weak. Toss in the thyme, bay leaves, and peppercorns, and allow it to slowly come to a boil. Lower the heat to medium-low and gently simmer for 1 to 1 1/2 hours, partially covered, until the chicken is done. As it cooks, skim any impurities that rise to the surface; add a little more water if necessary to keep the chicken covered while simmering.
Carefully remove the chicken to a cutting board. When its cool enough to handle, discard the skin and bones; hand-shred the meat into a storage container.
Carefully strain the stock through a fine sieve into another pot to remove the vegetable solids. Use the stock immediately or if you plan on storing it, place the pot in a sink full of ice water and stir to cool down the stock. Cover and refrigerate for up to one week or freeze.
Yield: 2 quarts
Zucchini Bread
The only times I've had zucchini bread was when I was still working and some coworkers would bring some in. The idea of zucchini bread didn't sound pleasing, but when I ate it, I thought it was pretty good. For some reason, I had a craving for some this past weekend, so I looked up recipes. This is the first time I made it and it was good! I seem to find a good baking recipe after a disastrous one. I did read the reviews and used 1 cup of brown sugar and 1 cup of white sugar. I forgot the applesauce so I ended up using 1 cup of oil after all. Okay, after eating all this food, I decided I'm going to go on a raw and organic vegetarian diet. Really.
Original Recipe:
Ingredients
3 1/4 cups all-purpose flour
1 1/2 teaspoons salt
1 teaspoon ground nutmeg
2 teaspoons baking soda
1 teaspoon ground cinnamon
3 cups sugar
1 cup vegetable oil
4 eggs, beaten
1/3 cup water
2 cups grated zucchini
1 teaspoon lemon juice
1 cup chopped walnuts or pecans
Directions
Preheat oven to 350 degrees F. In a large bowl, combine flour, salt, nutmeg, baking soda, cinnamon and sugar. In a separate bowl, combine oil, eggs, water, zucchini and lemon juice. Mix wet ingredients into dry, add nuts and fold in. Bake in 2 standard loaf pans, sprayed with nonstick spray, for 1 hour, or until a tester comes out clean. Alternately, bake in 5 mini loaf pans for about 45 minutes.
Shrimp Scampi with Linguine Revisited
I was watching a show featuring food in Italy and they were eating a simple dish such as this one, so then I craved for a similar dish. I loved the recipe from Tyler Florence, but decided to try a different recipe just for the heck of it. I tried Ina Garten's since she's one of my favorite FoodNetwork chefs. Using fresh shrimp sure makes a difference! (I had tried the frozen kind last time). I usually buy frozen because that's all they ever have at these supermarkets nearby. This dish is one of my favorite Italian dishes so far. I can't decide which recipe I like better now. I just remember loving the Tyler Florence recipe as it was immediately after I cooked it, so maybe I would prefer that one. This one is just as good though! 4/5 stars!
Original Recipe:
Vegetable oil
1 tablespoon kosher salt plus 1 1/2 teaspoons
3/4 pound linguine
3 tablespoons unsalted butter
2 1/2 tablespoons good olive oil
1 1/2 tablespoons minced garlic (4 cloves)
1 pound large shrimp (about 16 shrimp), peeled and deveined
1/4 teaspoon freshly ground black pepper
1/3 cup chopped fresh parsley leaves
1/2 lemon, zest grated
1/4 cup freshly squeezed lemon juice (2 lemons)
1/4 lemon, thinly sliced in half-rounds
1/8 teaspoon hot red pepper flakes
Directions
Drizzle some oil in a large pot of boiling salted water, add 1 tablespoon of salt and the linguine, and cook for 7 to 10 minutes, or according to the directions on the package.
Meanwhile, in another large (12-inch), heavy-bottomed pan, melt the butter and olive oil over medium-low heat. Add the garlic. Saute for 1 minute. Be careful, the garlic burns easily! Add the shrimp, 1 1/2 teaspoons of salt, and the pepper and saute until the shrimp have just turned pink, about 5 minutes, stirring often. Remove from the heat, add the parsley, lemon zest, lemon juice, lemon slices, and red pepper flakes. Toss to combine.
When the pasta is done, drain the cooked linguine and then put it back in the pot. Immediately add the shrimp and sauce, toss well, and serve.
Thursday, November 4, 2010
Cupcakes from Scratch
I suck at baking. :( I know I've said that before. I attempted to bake these cupcakes from scratch and the frosting as well, but the cake did not taste so good. They were okay. I think they just had too much flour in it. Baking is not forgiving at all. Ever since I started this blog, I have learned that cooking (including baking) is as much or even more of a science than it is an art form. And the frosting? It tasted better than the cake, but let me tell ya...frosting is one of those foods that I can not eat after I have seen how it's made. Yesterday, I made the frosting and after whipping all that butter, I just couldn't eat it. I just think to myself how gross it is that I'm really just eating a stick of butter. I have the same problem with mayonnaise. I don't eat mayo because I know how it's made. Oil, eggs, etc. all mixed together. Yuck. Sometimes (like today) when I "forgot" how it's made, then I'll eat it. The frosting I made didn't taste so bad, but it's not the best. I love the cream cheese frosting that's put on the pumpkin bars by Taste of Scandinavia in Minnesota.
Hmmm, should I even bother posting the recipes? I'll post the recipe for the frosting. I would give it 2 1/2 stars out of 5. It wasn't too sweet, but it really wasn't that special and I could still taste the flour from it. Maybe it's just me, but it really wasn't the best frosting I've ever had as the PW claims.
Frosting recipe here. This is the frosting that's made with flour.
Shoot, I just realized that I made the cupcakes from an adjusted recipe from another blog. No wonder it tastes like it has so much flour. It does! Here is the original recipe from Ina Garten. Maybe I'll try the original recipe one of these days. It's much different than the adjusted one. Argh.
Tuesday, November 2, 2010
Beef with Snow Peas
I don't know why, but I always thought snow peas were called sugar peas. At least that's what I grew up thinking. Along with cherry tomatoes, we used to grow and sell snow peas when I was younger. My parents would have about an acre or two of these. It was hard work! As a kid, my job was to just help plant the seeds, go with my mom to water the plants at night (because it would get so hot during the day in CA), and basically just sit and watch the "house" that my dad built for our farm. It was usually just my younger sister and I that went (out of all the kids in the family). Sometimes I was responsible for grilling the meats over the wood burning fire pit. That to me was some of the best food ever. As much as I disliked going to the farm back in the days, I also miss them now. It was a big part of my childhood and reminds me of how hard my parents worked. It reminds me a lot of my dad who's no longer with us. :( Our Hmong parents are truly great farmers. They know how to grow anything. When we stopped farming, I realized how much poorer we became because the extra income wasn't there to support us.
Anyway, there is really nothing special about the ingredients in this recipe, but I liked how it was cooked. I liked that it was cooked in an iron skillet and the meat was charred (like how I usually like meat). I also added garlic to mine. I love garlic. I just bought some cheap beef from Wal-Mart because I was already there and didn't feel like stopping at another store. Never buy fresh meat from Wal-Mart. They have some of the worst meat IMO. The dish was saltier than what I would've liked probably because I didn't have enough meat (only one pound instead of 1.5). Overall, I would give this recipe a 3/5 stars. Again nothing special, but I liked how it was cooked and how vibrant the sauce made the dish look once it's finished.
The recipe is from The Pioneer Woman. She has great photos and step by step directions, so I never even bother to repeat hers. I'll post the recipe anyway in case it should ever disappear somehow.
Ingredients
1 1/2 pound Flank Steak, Trimmed Of Fat And Sliced Very Thin Against The Grain
1/2 cups Low Sodium Soy Sauce
3 Tablespoons Sherry Or Cooking Sherry
2 Tablespoons Brown Sugar
2 Tablespoons Cornstarch
1 Tablespoon Minced Fresh Ginger
8 ounces, weight Fresh Snow Peas, Ends Trimmed
5 whole Scallions, Cut Into Half-inch Pieces On The Diagonal
Salt As Needed (use Sparingly)
3 Tablespoons Peanut Or Olive Oil
Crushed Red Pepper, For Sprinkling
Preparation InstructionsIn a bowl, mix together soy sauce, sherry, brown sugar, cornstarch, and ginger. Add sliced meat to bowl and toss with hands. Set aside.
Heat oil in a heavy skillet (iron is best) or wok over high heat. Add snow peas and stir for 45 seconds. Remove to a separate plate. Set aside.
Allow pan to get very hot again. With tongs, add half the meat mixture, leaving most of the marinade still in the bowl. Add half the scallions. Spread out meat as you add it to pan, but do not stir for a good minute. (You want the meat to get as brown as possible in as short amount a time as possible.) Turn meat to the other side and cook for another 30 seconds. Remove to a clean plate.
Repeat with other half of meat, allowing pan to get very hot again first. After turning it, add the first plateful of meat, the rest of the marinade, and the snow peas. Stir over high heat for 30 seconds, then turn off heat. Check seasonings and add salt only if it needs it. Mixture will thicken as it sits.
Serve immediately over rice. Sprinkle crushed red pepper over the top to give it some spice.
Thursday, October 28, 2010
Make Fresh Spring Rolls Stay Fresh (longer)
This past weekend was my son's first birthday, so I was on a mission to cook a lot of food by myself. I even planned to bake his own mini cake with cupcakes, but then I got sick and didn't feel like doing all that cooking anymore. I decided a day or two earlier to cater half the food and order a cake. Fortunately I did that because even after waking up at 4:30 in the morning, I almost didn't finish cooking everything. And fortunately for my guests, they got to eat a yummy cake since I am not the best baker. :P It just feels good to make something yourself, especially for your little one, you know? Oh well, next time. Since I bought so much ingredients, I might as well attempt to make some cupcakes from scratch this week.
One of the things I did make were fresh spring rolls. I think the best spring rolls are the ones you make at home, because you can put anything you like in them and they are truly fresh. I have since learned of a new method to help keep them stay fresh longer. This is important if you're making them for a potluck or a large crowd and they won't be eaten right away. In any case, spring rolls are meant to be eaten the same day, within hours. They are not meant to be refrigerated or saved for the next day. Try it and you'll find out! :D
I've been making these for several years, but they just never turn out how I like them to. I even made them once for my husband's potluck at work and he told me they didn't look too good by lunch time. I woke up at 5AM to help him kiss ass for nothing. :p I think I finally found the
secret(s). After prepping them 5AM in the morning, and people didn't eat until after 1:00 afternoon, the ones I made this past weekend still stayed fresh. By fresh, I mean the wrapper did not tear (as bad) and the wrapper stayed soft (not rubbery like some in the past). Having the wrapper stay in tact is important because it helps keep the rest of the stuff inside stay fresh as well.
Makes about 30 rolls
Ingredients:
Rice Vermicelli Noodles
1 lb pork loin chops
Salt
2 tbsp Hoisin sauce
1 tbsp Oyster Sauce
1/2 tsp Soy Sauce
1 lb uncooked shrimp, deveined and peeled
Red leaf lettuce
2-3 Cucumbers
3-4 Carrots
2 bunches of cilantro
1 package of spring roll rice paper, must be Three Ladies Brand
Method:
1. Cook the vermicelli noodles according to package instructions. Make sure the noodles come out soft and rinse it under cold water to get rid of the extra starch. Drain the noodles and set aside. It's important to have the noodles (air) dry. This is why I do this step first, but I'm usually multi-tasking. ;)
2. Set the oven to broil at 500 degrees. Mix the sauces and set aside. Prep the pork by seasoning it lightly with salt. Broil the pork for about 15 minutes on one side until cooked (fat around the meat should be brown and almost crispy looking). Turn the meat over and cook for an additional 5-10 minutes or until cooked through. Once the meat is browned, this is when you put the sauce on the meat (I use a basting brush). Let it cook for less than a minute until the sauce starts to sizzle and brown on the meat. Turn over and repeat. Once the meat is cooled, slice the meat into thin strips. Set the cooked meat aside.
3. Boil the shrimp in a pot of boiling water until pink. Drain and set aside. You'll need to slice the shrimp in half. You can do it now or later.
4. Wash all the vegetables and cilantro. After washing the lettuce and cilantro, I use a salad spinner to spin dry them. It really makes a difference. If you don't have one, you can use paper towels to pat dry the lettuce and cilantro. It's important to have all your ingredients dry (except for the cucumbers, of course).
6. Peel the carrots and cucumbers and cut them into matchsticks. I've been using the Titan peelers to peel all my fruits and veggies as well as to julienne my carrots and cucumbers. I love it. :)
The cucumbers will be the wettest/moistest ingredient. If it has too much liquid you can simply drain out some of the liquid, but not too much since that's part of the taste. When rolling, I usually put the cucumbers in the middle anyway, so it doesn't touch the wrapper. Here's all my ingredients lined up on the table and I am ready to wrap and roll. I didn't cut my shrimp in half in these pictures because I had so many leftover and decided to use the whole shrimp. I actually like the taste of a half shrimp better, so I would stick with that. Also with the cilantro, you can use the sprigs of cilantro as pictured or simply use the leaves.
Now, comes the "secret" part after doing some Googling and experimenting. What I used this past weekend was a package of already cut quarters of the spring roll wrappers. I forgot to take a picture of these, but I drew a line here to show how they would look like when you see them in the stores. The Three Ladies Brand carries this and that is what I used. In the pictures below, I cut them in half as per other instructions, but honestly, cutting them in quarters tasted better to me. Some people might just use two wrappers entirely, but I do not like the taste of a thick wrapper and that's why the quarter sheet is the way to go.
The quarter sheet should be placed in the middle along with the full sheet and dunked in hot water. The quarter sheet helps hold the rest of the ingredients better and avoid the tearing in the spring rolls, without that extra wrapper taste.
Initially, I start out with hot water only because it's my first wrapper and it softens it quickly. I use the same water for about 10 rolls and start with fresh hot water all over again. I usually place new wrappers in the water as I am rolling the other that I just prepped.
Take out the sheets and place it onto a large plate that's been covered with a clean dish cloth. The dish cloth helps absorb a lot of the water and this is an important step as well. Sometimes, I use an extra dish cloth to absorb the excess water on the top of the wrapper.
Start out by placing a lettuce leaf on the bottom of the wrapper (I like to just use the outer parts of the leaf because it's softer and won't tear the wrapper), followed by some noodles, cucumbers, carrots, cilantro and pork.
Roll, tighten, roll...place the shrimp and ready to roll them over as well.
Wrap in the sides of the wrapper in and tightly roll.
When I made these for a large gathering, I place them in one of those large aluminum catering trays that come with a plastic top. I try not to place the spring rolls close to each other, and never on top of each other without placing something in between them. I used parchment paper in this case and that worked well. Instead of the saran wrap, I just put the plastic dome/top over the tray and that helped (along with other steps mentioned above) made the spring rolls stay fresh for hours. Using the Three Ladies Brand produced that soft texture that I like. Some other brands taste rubbery-like to me. Hope this helps you out!
*Sauces*
Sauces deserve their own posting, so one of these days I'll make a posting about the different sauces that can go with spring rolls, egg rolls and rice rolls. Everyone likes theirs a little different.
In the meantime, this is one of the quick sauces I use for spring rolls as well as egg rolls. Sometimes I add a little fish sauce, lime juice, Thai peppers as well as peanuts to this sauce. It's one of the quickest and yummy sauces you can make!
Saturday, October 16, 2010
Penne Pasta with Shrimp and Herbed Cream Sauce
Boy, I felt like I haven't cooked in a long time! I really haven't. I have been going out to eat too much and making fast food. I haven't experimented in a while. I do miss that because it gives me the chance to eat different food that's home made. Nothing beats home made food! I don't care how good the restaurant. Somehow, it just tastes different and better to me.
Anyway, here is a fabulous Italian dish that I made last night. It was quite yummy, even as leftovers. I usually don't like creamy sauces, but I did not mind this one. It wasn't as thick and I liked that. The sauce wasn't too thick, but I would've wanted more sauce to cover my pasta. Next time, I might just make half the pasta. I also messed up and didn't read the full recipe before I started cooking, so I ended up putting the whole can of tomatoes into the sauce pan. The recipe had called for drained tomatoes. I quickly took the tomatoes out and started cooking a new batch of garlic and oil, but I know I lost some of the broth from the shrimp. It was still tasty anyway. I just love the smell of garlic cooking in olive oil mixed with other herbs. Italian food always smells good.
Here is the original recipe from good old Food Network. I try to find recipes with good ratings and then make them. Most have been on the spot as far as ratings go.
Ingredients
1 pound penne pasta
1/4 cup olive oil
1 pound medium shrimp, peeled, and deveined
4 cloves garlic, minced
1/2 teaspoon kosher salt, plus extra for seasoning
1/2 teaspoon freshly ground black pepper, plus extra for seasoning
1 (15-ounce) can whole tomatoes, drained, roughly chopped
1/2 cup chopped fresh basil leaves
1/2 cup chopped fresh flat-leaf parsley
1/4 teaspoon crushed red pepper flakes
1 cup white wine
1/3 cup clam juice
3/4 cup heavy whipping cream
1/2 cup grated Parmesan
Directions
Bring a large pot of salted water to a boil over high heat. Add the pasta and cook until tender but still firm to the bite, stirring occasionally, about 8 to 10 minutes. Drain the pasta and set aside.
In a large skillet, heat the oil over medium-high heat. Add the shrimp, garlic, 1/2 teaspoon of salt, and 1/2 teaspoon of pepper. Cook, stirring frequently until the shrimp turn pink and is cooked through, about 3 minutes. Using a slotted spoon, remove the shrimp and set aside.
Add the tomatoes, 1/4 cup basil, 1/4 cup parsley, and the red pepper flakes. Cook for 2 minutes, stirring constantly. Add the wine, clam juice, and heavy cream. Bring the mixture to a boil. Reduce the heat to medium-low and simmer for 7 to 8 minutes until the sauce thickens. Add 1/4 cup of the Parmesan, the cooked shrimp, the cooked pasta, and the remaining herbs. Toss together until all ingredients are coated. Season, to taste, with salt and pepper.
Transfer the pasta to a large serving bowl. Sprinkle with the remaining cheese and serve immediately.
Wednesday, August 25, 2010
Taste of Thailand
The above pic is the curry chicken I attempted to make from Taste of Thailand. I took all the pics with my camera phone, but as you can see, it looks a lot better than the one I made at home. lol I think mine was sort of close. I think. :P
We went to Taste of Thailand a few weeks ago and every time we go there, the food is always great! I think this is my favorite Thai restaurant in the cities. We usually go to the one in St. Paul on Selby and Snelling. We ordered the usual: curry with spinach and chicken and their spring rolls. We decided to order their pad thai this time and tried their beef salad as well since I've recently grown fond of the Thai beef salad. I'm going to try to make it one of these days. The only complaint I had was that there wasn't enough of it! I wished they would've added more lettuce and less onions. It was very good though. It tasted similar to the one I had at Amazing Thailand, but the portion at Amazing was much bigger. I used to think ToT's spring rolls were the best even though they make them really plain. I think it is the sauce that makes it so good. I prefer the sweet/peanut sauce over the hoisin sauce at Vietnamese restaurants. I have ordered pad thai from ToT before, and don't remember it to be all that great, but for some reason this time was really good!
I haven't done my usual blogging-cooking for a while now. I've been mostly just making meals that I know by heart and haven't tried experimenting anything new recently. I've been so busy with everything: being a mom, wife, work, school, and trying to find ways to make additional income. I actually have a few other blogs out there, but they're more personal blogs. Anyway, maybe when the winter comes, I will cook more since there's less to do outdoors.
Pad thai:
Beef salad:
Monday, August 2, 2010
Curry Chicken with Spinach
I have found a great Thai cooking book. I have tried four recipes so far, and so far, so good. It has great pictures as well. I was anxious to try out their curry recipes as the ingredients seemed like it would taste good. I was right! This was the best curry I've made at home so far. I was trying to make the same chicken curry from Taste of Thailand. I love that dish. They serve the curry with spinach. Spinach?? Yes, spinach. It's actually quite tasty with the spinach. I actually could just eat the curry with the spinach and skip the chicken, but it probably won't fill me up as much. So, I adapted this recipe I found and tried to make it similar to the one at Taste of Thailand's. I think it's pretty good. When I have more time, I am going to try to make my own curry paste from scratch. I have made this dish twice now with red and green curry. Both are good. I know the picture doesn't look good, but the dish was good IMO. My husband loved it and licked the bowl. He wants me to make curry everyday for him, but coconut milk is very fatty. The original recipe called for only one tablespoon of palm sugar, but my husband likes his curry sweet so I added 2 or 3 more tablespoon. You can start out with one and then adjust, but I liked it at 3 or 4 tablespoons. Sorry, I didn't write down what I did exactly since I made this two weeks ago.
Ingredients:
1/4 cup of coconut cream
2 tbsp red curry paste (Maesri brand)
12 oz skinless chicken thigh fillets, sliced
1 3/4 cups of coconut milk
2 1/2 tbsp fish sauce
3 tbsp of palm sugar
1 bag of baby spinach (can't remember what mine was...4-9 oz?)
Chopped Roasted Peanuts
Method
1. Put the coconut cream in a wok or saucepan and simmer over a medium heat for about 5 minutes or until the cream separates and a layer of oil forms on the surface. Stir the cream if it starts to brown around the edges. Add the curry paste, stir well to combine and cook until fragrant.
2. Add the chicken and stir for a few minutes. Add nearly all of the coconut milk, the fish sauce and palm sugar and simmer over medium heat for 5 minutes. Reduce the heat to medium low and continue to cook the chicken for an additional 10 minutes.
3. Meanwhile, boil a pot of water on high heat to blanch the spinach. Prepare a large bowl of ice cold water on the side. When the water is boiling, pour the baby spinach in pot and boil for about 30 seconds. Immediately pour the spinach into a colander to drain the water, then transfer the spinach into the ice cold water to stop it from cooking. Transfer the spinach into a colander to drain the remaining water and set aside until ready to eat.
4. The spinach is put into the curry chicken when it is ready to eat. Serve on a plate with some rice. Top the curry dish with the chopped roasted peanuts.
Sunday, July 18, 2010
Spicy Shredded Beef
This is one of my favorite Hmong dishes. It's Hmong because I haven't eaten it anywhere else besides our Hmong household lol. I've been eating/making this ever since I was a young girl.
We had some relatives that stayed with us for a few days and one of them made this dish for us. It was the first time we've ever had this dish (my family and I) and we thought it was soooo good! It still is. I've been making it since then. The funny thing is that back in the old days even though it was available at the time such as the food processor, can opener, mop and broom, etc., my family never bought any of those "modern" appliances. We did everything the old-fashion-back-in-Laos days. Yep, we chopped meat manually, opened the cans with knives and mopped the floors with towels using our feet. Even though the convenience was out there, I still chopped this meat manually for several years until just a few years ago, I finally decided to go buy a mini-food processor. That was why I didn't like making this dish as much because it took so much time chopping the meat, but I knew it was all worth it.
Ingredients:
1 lb of beef (I normally just buy the beef for beef stew that comes in chunks at the store)
2 cloves of garlic
1/2 cup cilantro, chopped
1/2 cup green onions, chopped
1 1/2 tbsp of fish sauce,
1 tbsp of lime juice (has to be fresh, never use that other kind!)
1 tbsp of dried red chilli pepper, crushed
Method:
Spread the meat evenly on a foil-lined baking sheet. Broil at 500 degrees until brown on each side, about 20 minutes the first side and 5-10 minutes the other side. When you turn over to the other side, be sure to drain the liquid off the baking sheet. You do not want the meat to get moist. It needs to be dry, almost like beef jerky.
This is how the meat should look like after it's cooked on both sides. I let my meat cool off either still on the rack or in a dish. I don't like to run things that are hot in my food processor for fear of burning the thing. It's happened before at another household.
Once meat has been cooled off, chop (shred) the meat in a food processor until medium-finely chopped; otherwise, you can manually chop the meat with a knife.
Using a mortar and pestle, pound two cloves of garlic until bruised.
Next, throw in the meat, cilantro and green onions. Mix with a spoon.
Add the fish sauce, lime juice and pepper. Mix well with a spoon. This is where you might want to go sparingly because you might like yours less salty, sour or hot. This is just how I made mine and I like things spicy and hot!
Using the pestle and spoon, mix and pound all the ingredients together. I prefer using the mortar and pestle because it allows one to infuse all the flavors together. I don't get the same effect with any other method.
Keep pounding it a couple of times until the meat and herbs are somewhat bruised:
This dish is meant to be served at room temperature or even cold. I just like eating it with white rice and mixing the two. Tastes great with sticky rice too.
Monday, July 5, 2010
Favorite Recipe Search
Can you guess what the most searched recipe is that leads visitors to my blog? It's so sweet. (Pun intended.) Yep, just about everyday, someone across the globe searches for "nab vam" or "tricolor dessert." I do wish more people would leave comments, especially if they have tried the recipe. It would help me improve things if the recipe needs improvement or provide others more tips. I don't blame them. Nab vam is a yummy dessert, probably the yummiest Asian dessert there is out there since we aren't known for our desserts. Have you ever notice that when you go to an Asian restaurant, there isn't much variety in the dessert menu (if there is one at all)? I think most Asian restaurants have a dessert section in their menus just to cater to the American public since Americans consume so much sweets.
Thanks for visiting!
Sunday, June 20, 2010
California Summer Rolls
I bought some of these summer rolls made by a local sushi place. Even though they are very plain, they taste so refreshing to me. I love cucumbers and avocados so maybe that's why I like these. They are like the California sushi rolls without the rice and seaweed. I also really like the spring roll wrapper that they used. It's very soft and not like the ones I have used before. I finally bought this one brand recommended by some people and I think I found the right wrapper! It tastes exactly like the one the sushi place uses.
Anyway, on a hot summer day when I don't feel like eating anything too heavy, these are great. These are also great because there is hardly any cooking involved. Making the tamago (omelette) is pretty easy.
Makes about a dozen rolls
Ingredients
1 cucumber
1 avocado
1 small package of imitation crab/lobster sticks or cooked shrimp
Tamago (Japanese omelette)
Spring Roll wrapper (Three Ladies Brand)
Spring Roll sauce (see picture)
1. Prep and cook the Tamago. See recipe below.
2. Cut the cucumber and avocado into long slices or strips (about 2 inches long, 1/2inch wide). Cut the crab or lobster sticks in half lengthwise. If using cooked shrimp, cut the shrimp in half lenthwise as well.
3. Fill a large deep bowl with hot water and put in a single sheet of wrapper into the bowl. I work with just one wrapper at a time to make it easier. Once the wrapper is soft and pliable, take out the wrapper and put it on a plate. You can put the wrapper on top of a dish cloth too, to soak up some of the water.
4. Assemble on top of the wrapper with one seafood stick or 2 shrimp haves. Top it with 1-2 strips of cucumber, 1 strip of avocado, and 1 strip of the tamago. These ingredients should all be clumped together. Then roll the right and left sides of the wrapper in, and then finally rolling into a roll. I didn't take any step by step photos this time, so feel free to reference here on how to roll these.
Tamago Ingredient and Recipe:
3 eggs
1 tbsp sugar
1 tsp light soy sauce
1. Mix all ingredients well.
2. It's kind of tricky explaining the cooking part, so I recommend just following some videos on YouTube such as this one. I just used a regular round non-stick pan to make mine.
3. Cut the omelette into strips and set aside.
This is the lazy sauce I used for these rolls. This is also the same sauce I used (and mixed) for the rice rolls. I usually make a homemade sauce for other types of spring/summer rolls, but too lazy! Eventually, I'll make some more and different rolls, so maybe I'll post those and the sauce one of these days.
Tuesday, June 15, 2010
1st Restaurant Review: Amazing Thailand, Minneapolis
I think I mentioned this before, and in case you haven't noticed, my favorite foods are Thai, Vietnamese and Italian. My coworker who likes similar food as I do recommended this Thai restaurant in uptown Minneapolis called Amazing Thailand. He's been there a couple of times already, so I wanted to try it out for myself. The only other Thai restaurants I've tried are Taste of Thailand in St. Paul and Sawatdee in uptown a long time ago.
Just about everything we ordered was good. I was truly impressed. We ordered the Thai beef salad, red curry, Pad See Iew noodles, and papaya salad. My coworker told me their papapya salad was really good. Unfortunately, I didn't think it was that great. I was hoping it would taste more like the papaya salad I had at The Thai House in Fresno, CA. Somehow they made it simple, but so good. It's still one of my favorite restaurants because I grew up eating there.
Anyway, when you drive by Amazing Thailand, it's easy to miss because of all the shops around uptown, but you'll be surprised inside. It's actually a nicer Asian restaurant than most you see in the Twin Cities area. It is professionally and tastefully decorated with a Thai/Asian theme throughout. The interior was dark due to minimal lighting. They do have some seating outdoors in a small alley and out the front of the restaurant. I actually liked the small alley because it had some unique furniture and it just felt unique being out there, but my husband didn't like it at all. He said it was in an alley, but I thought it felt really exotic being outside. I'm not that big of a fan of dark-interior restaurants, but oh well...at least the food won me over. The service was good too. If I had to compare this to the two Thai restaurants in the Cities, I would rate this one above the other two because food was great, service was good, and the interior was nice. I do like the curry dish at Taste of Thailand more though, but T-of-T service is really slow. Every time we go there, there's like an hour wait to get our food and just when we think they forgot about us, we finally get our food and forgive them after we eat their curry dish. I won't even compare those two restaurants with Sawatdee. I only been there once and it was never that impressive. I'll have to try other Thai restaurants in the future.
So if you like Thai food, I would highly recommend Amazing Thailand. I meant to order a different noodle dish than the one I ordered, but I ordered the wrong one. Either way, it was still good. Yum. I was hoping that my family from WI would come up here and I have another reason to go out to eat, but maybe next time!
Rating: Highly recommended. 4/5 stars for a restaurant in its class. Why only 4? I wish their papaya salad was good as well. I'm probably being too picky, but a 4 in my book is a 5. haha
(Sorry I took the above pic with my cell phone. I didn't know I was going to do a review). :P
Sunday, May 23, 2010
Korean Short Ribs (kabi)
This uses the same marinade as the recipe for bulgogi. I was trying to be a little more adventurous by trying a different marinade recipe. Should've just stuck to what I know is good. I tried a different recipe today and the meat turned out too salty. It was still yummy, but too salty. I would've liked it to be sweeter. Part of the reason is probably because I also tried out a new soy sauce instead of my usual lower sodium soy sauce and the recipe called for less sugar than one I used earlier. Also, I bought the kimchi from a non-Korean grocery store, and it did not taste as good as the one I previously bought. The kimchi was also too salty. All in all, the meat and kimchi were too salty, so they did not complement each other as they were supposed too. I would make this again, except I would just use the recipe I made in my earlier post for bulgogi.
Here is a good post on how the flaken-ribs should look like when you look for it at the store, but I do not recommend the recipe. It turned out too salty for my taste. It didn't even have ginger or regular onions so I added them on my own. I wanted to add more sugar too, but wanted to "trust" the original recipe. I think it's time I trust my own cooking instincts. I'm getting better at cooking now, so why not?? :P If I did, I wouldn't have thrown up when trying this other recipe I found a while back when it called for one or two tablespoons of shrimp paste. Gross. I mean, the only time I use shrimp paste is in my papaya salad and I only use a little, itty bit of it. Again, I should've known and trusted myself! I guess I thought the thought of using that much shrimp paste would've been okay since that is how curry paste is made, but this one wasn't a curry dish. The picture looked so good too. Oh well, this blog is a food adventure-blog after all. No (more) regrets! :P
Ingredients:
4 lbs flaken-style beef short ribs (I found mine at Dragon Star oriental store)
Marinade:
1/2 cup soy sauce
1 Korean pear or Asian pear, grated with juices
2 tablespoons finely chopped garlic
1/2 small white onion, grated or sliced
1 tablespoon grated fresh ginger
2 tablespoons light brown sugar
1 tablespoon honey
2 tablespoons sesame seeds, toasted
2 tablespoons toasted sesame oil
1/4 teaspoon ground black pepper
2 green onions, thinly sliced
1 (20-ounce) bottle lemon-lime soda, optional (recommended: Sprite or 7-Up)
Method:
1. Mix all marinade ingredients together in a large bowl. Add meat to the bowl and mix well. Transfer the marinated meat to a Ziploc bag and marinate overnight. Make sure to let out all the air from the bag.
2. Grill meat on grill for about 4 minutes, or if using oven, set to BROIL at 500 degrees and broil each side for about 4 minutes or until slightly charred. It should not take very long to cook these since they are cut thin.
3. Serve with rice and kimchi. This would also go well with sides of veggies. Yum!
Wednesday, May 19, 2010
My Attempt at Making French Macarons
I wish these were mine. They're actually from the site mytartelette.blogspot.com. I attempted to make French macarons. Twice now. The first ones were chocolate, the second ones just a plain recipe with pistachio middle like my favorite ones from Cocoa and Fig. The chocolate ones I had no problem whatsoever removing them from the sheet, but the second ones I could not move a centimeter without messing them up. They tasted so good though. I didn't throw them away. I scrubbed them off the baking sheet and ate them as is. They weren't cookies anymore, but some odd shape. lol They also turned out flatter than what I've seen. I think it's because I just didn't' have the exact measurements. The recipe I used was in grams, but I don't have a food scale to measure in grams. I tried converting it, but it's too off. Baking is not like cooking. If you're off by one speck of flour, then the recipe is ruined. At least that's what it seems for me. So, as soon as I buy my scale, some powdered food color and other things, then I will attempt these again. I know I can get these right! Darn it! I was so excited when I put them in the oven and they formed feet.
Look how flat and ugly mine looks :( :
Malaysian Enche Kabin Boxing Chicken Wings
I've been meaning to try and make these for a while now since I've discovered Lily's blog last year. I guess it was the deep-frying that delayed it. As much as I don't like deep frying foods, I have deep fried foods 3x now in the last two weeks. One of those (orange chicken) did not turn out. Guess I'll just stick to Panda Garden's orange chicken lol. There might be a 4th deep frying session coming soon since I've been meaning to make some egg rolls. Those are too tedious though! :P
Ok, back to this recipe. This was very good. I couldn't find a meat curry powder, so I just used like two different kinds of curry. A powdered one and a paste one. I just mixed it all together with the other stuff. I think it still turned out good. I don't think I would bother deep frying these next time though. I might just pan fry it first and then bake it in the oven or vice versa. When the wings were done, I thought they tasted good, but nothing spectacular. It was when I dipped it in the sauce was when I thought to myself, "Yum, these are good!" I really liked the sauce. It went well with the wings. To think I was going to skip making the sauce! Good thing I didn't. I have a new favorite dipping sauce. The dijon mustard made a difference. I rate this recipe 4/5. Anyway, here's the recipe from Lily's blog.
Thai Basil Chicken
There's a small fast food Thai restaurant in the Minneapolis skyway where I work where I first tasted this dish. I originally ran into a recipe from Thai Foodcast, but was not impressed with it. It didn't taste like the one I had at the restaurant. Not only was it too salty, but it didn't taste "Thai" to me. The one at the restaurant had grounded chicken, but the sauce was much better. I guess I should've known when the recipe called for four tablespoons of oyster sauce. I didn't remember the dish to taste like oyster sauce at all. So, since I had some more basil on hand and since I've been buying a lot of chicken breasts, I decided to try a different version of this. One of my new favorite food blogs that I just recently encountered is Rasa Malaysia. That is where I got the recipe for the second attempt. This version tasted much better and more closely resembled the restaurant that I tried. It uses fish sauce instead of oyster, which is more authentic Thai. My picture doesn't look that good since I took it at night time, but I thought this dish was good. I'll give it a 4/5. Easy to make and tastes good. It might be too salty/spicy for some, but then again, this is Thai!
The other version that I didn't like:
Malaysian Curry Puffs
Wow, been away for almost a month now. I've been cooking off and on still, but just haven't bothered to post anything. I was planning on making some egg rolls two weekends ago, but then came upon a recipe for these curry puffs, and decided to try making these instead since I've never had them. For the dough, I tried two different recipes. One from Rasa Malaysia and then another from Lily's Wai Sek Hong. I intially tried Lily's first, but the dough just didn't look right. It was not soft nor what's the word? Flexible? It was too dry. I tried adding a little more water, but it still didn't look right. Fortunately, I went back to other recipe from Rasa Malaysia and the dough looked much better. Since these were my first time making them, it took me a while to get the dough rolling and wrapped correctly. The first one I made, I used too much dough and so it didn't cook thoroughly. It works best if you just use a small ball and then roll it out with a roller pin. The oil had to be just the right temperature as well. You want it hot, but not too hot. When I finally got done, these didn't blow my mind away like "Ymmmm, these are so good! I just have to make them again!" Unfortunately, no. They were just ok. I don't consider myself a picky eater either. Overall, I would rate these a 3/5. I would recommend making these if you like to try something different and if you like fried foods. I really liked how the crust turned out though. It was buttery and flaky. Boy, did I use a lot of oil for this recipe. A lot of oil in the filling, and of course, the deep frying. That's why I hate deep frying. Too much oil. I also ate these as leftovers the next day, and for some reason, I thought it tasted better the next day.
Meatloaf
I made this a while back, but just never posted it. Maybe it's because I'm not the biggest fan of meatloaf. I decided to just make it for my husband since he likes it. This recipe was good, but it didn't change my mind about loving meatloaf. I like meatballs, but for some reason I don't like meatloaf. They're similar, but not exactly the same. I guess I would give this recipe of 3. Not great, but not bad either. The sauce or relish for the meatloaf is different though. Much different than your regular ketchup. I actually liked that part of the recipe. The potatoes I've made before (from scratch of course) and the beans were just drizzled with olive oil, seasoned with S&P, then baked in the oven at 350 degrees for about 15 minutes until tender but still crisp.
Recipe from Food Network.
Wednesday, April 21, 2010
Shrimp Scampi with Linguini
This looks like a simple dish, and it is, but tastes good. Lots of fat though. Most of my food here are fatty. So, if you came looking for healthy recipes, you won't find them here. I try to make healthy food once in while, but since this blog is about experimenting, I just make whatever I feel like and I try not to count calories. Fortunately, I haven't gained any weight since I started this blog. It's all about portion size for me.
Even though I didn't have all the ingredients for this dish, it still turned out good. I used frozen shrimp because they were on sale and dried parsley because that's all I had. The second time I made this I didn't have any white wine. Each time, it still tasted good. I would give this recipe a 4 out of 5 for simplicity and taste.
Recipe from Food Network.
Subscribe to:
Posts (Atom)